Master Chair Crafting: A Complete Journey from Wood to Masterpiece

Chair crafting represents one of humanity's most enduring and practical art forms. From the humble three-legged stool to the most elaborate throne, chairs embody the perfect marriage of function and beauty. Whether you're drawn to the meditative rhythm of hand tools or excited by the precision of modern machinery, chair crafting offers a rewarding journey that combines technical skill, artistic vision, and deep satisfaction. This comprehensive guide will take you through eight essential steps, transforming you from curious beginner to confident chair designer and craftsman. Every master craftsperson started with a single cut, and your journey begins today. View original learning path
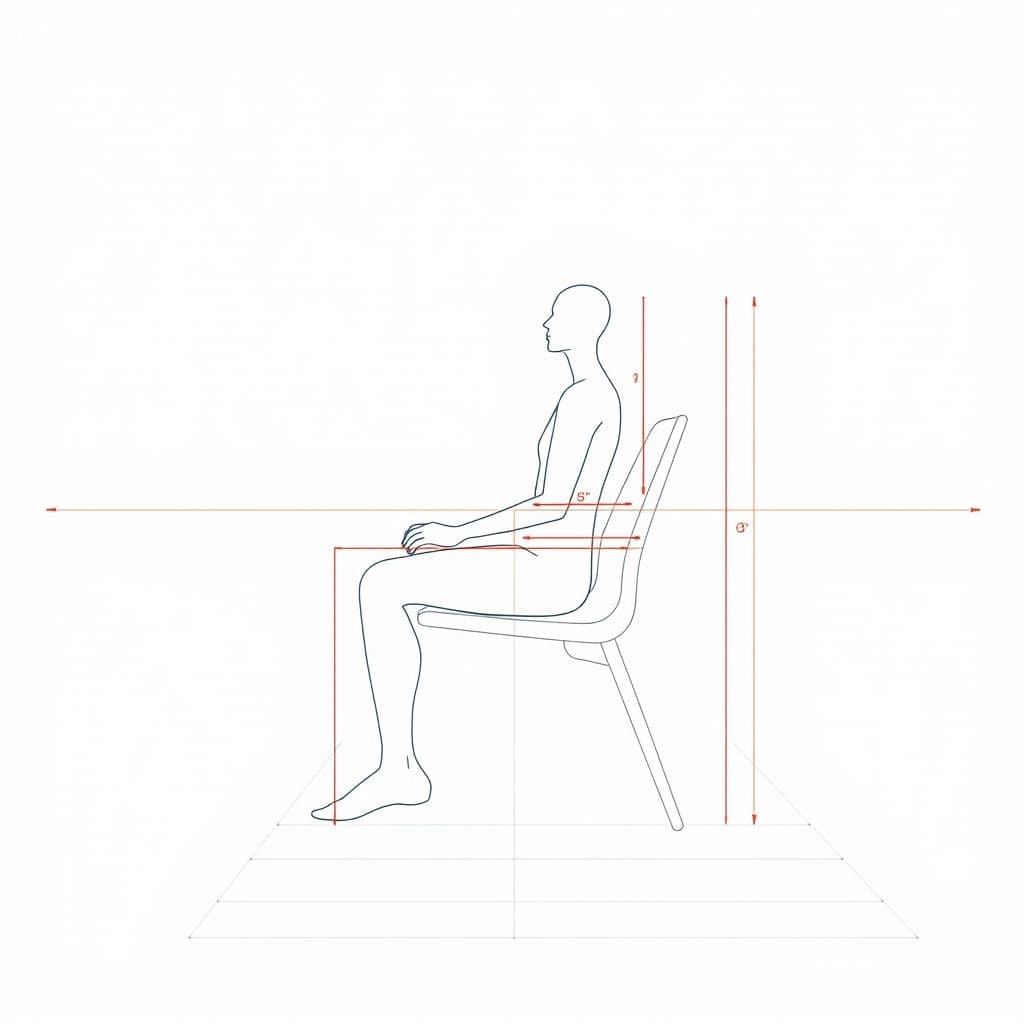
Step 1: Understand the Basics of Chair Design
Before touching a single piece of wood, successful chair crafters master three fundamental concepts that determine whether their creation will be a joy to use or a beautiful disappointment. Ergonomics forms the invisible foundation of great chair design—understanding how the human body interacts with furniture transforms your approach entirely. Study seat heights between 16-18 inches, backrest angles of 100-110 degrees, and armrest positions that support natural shoulder placement. Materials selection goes beyond aesthetics; hardwoods like oak and maple offer durability for structural elements, while softer woods can provide comfort in seat construction. Consider grain direction for strength, moisture content for stability, and how different species respond to finishing. Structural integrity ensures your chair withstands decades of use through proper load distribution, appropriate joint placement, and understanding stress points where the human body applies force during sitting and rising movements.
Step 2: Learn Woodworking Techniques
Precision in measuring and marking separates amateur efforts from professional results. Master the carpenter's rule of 'measure twice, cut once' by developing systematic marking techniques using quality measuring tools, understanding wood movement, and accounting for kerf width in your calculations. Cutting and shaping wood requires understanding grain direction, selecting appropriate tools for different cuts, and developing steady hands for smooth, accurate results. Practice crosscuts, rip cuts, and curved cuts on scrap wood until your movements become instinctive. Joinery represents the heart of furniture construction—learn fundamental joints like mortise and tenon, dovetails, and dado joints. Each joint serves specific structural purposes: mortise and tenon for frame construction, finger joints for box construction, and sliding dovetails for connecting components that must resist lateral forces while allowing for wood movement.
Step 3: Study Chair Design Principles
Proportions and scale determine whether your chair appears graceful or awkward, regardless of craftsmanship quality. Study the golden ratio in furniture design, understand how seat-to-back ratios affect visual weight, and learn to adjust dimensions for different user populations. Balance and stability go beyond preventing tip-overs—they encompass visual balance that makes chairs appear grounded and stable even when viewed from different angles. Consider the relationship between leg splay, seat overhang, and center of gravity. Aesthetics in chair design involves understanding style periods, recognizing what makes designs timeless versus trendy, and developing your personal design voice while respecting functional requirements. Study iconic chairs from masters like Hans Wegner, Charles Eames, and Sam Maloof to understand how form follows function in memorable furniture design.
✨ This guide exists as a free, trackable step-by-step path
Open the Interactive Path →
Step 4: Develop Sketching and Drafting Skills
Perspective drawing allows you to visualize chairs in three dimensions before committing to expensive materials. Master one-point and two-point perspective, understand how to show depth and proportion accurately, and develop speed in capturing design ideas before they fade. Practice drawing chairs from observation to train your eye for proportion and detail. Technical drawing provides the precise communication needed for consistent construction. Learn orthographic projection to show front, side, and top views with exact dimensions, understand section views for complex joints, and develop clear annotation techniques. CAD software accelerates the design process and allows for rapid iteration. Popular options include SketchUp for beginners, Fusion 360 for intermediate users, and SolidWorks for advanced applications. Start with basic modeling, progress to complex assemblies, and eventually explore rendering capabilities that help clients visualize finished pieces.
Step 5: Practice Chair Construction Techniques
Cutting and joining angles requires understanding compound angles where legs meet rails, calculating splay angles for stability, and executing precise cuts that ensure tight joints. Master the use of jigs and fixtures that guarantee repeatability when making multiple components. Creating joints becomes second nature through dedicated practice—start with simple butt joints, progress through lap joints, and eventually master complex joints like compound miters. Each joint type has optimal applications: use dados for shelves, rabbets for back panels, and mortise-and-tenons for structural connections. Sanding and finishing transforms rough lumber into furniture-quality surfaces. Understand grit progression from coarse to fine, learn to identify when to stop sanding to avoid over-working surfaces, and develop finishing schedules that enhance wood's natural beauty while providing appropriate protection for the intended use environment.
Step 6: Experiment with Different Chair Styles
Traditional chairs offer rich historical precedents that teach fundamental construction principles. Study Windsor chairs for bent-wood techniques, Chippendale for carved ornamentation, and Shaker for functional simplicity. Each tradition developed specific solutions to common challenges—understanding these solutions expands your problem-solving toolkit. Modern chairs emphasize clean lines, innovative materials, and efficient production methods. Explore the work of mid-century designers who revolutionized furniture with plywood molding, metal integration, and ergonomic research. Contemporary chairs push boundaries by incorporating new materials, unconventional forms, and responses to changing lifestyle needs. Experiment with mixed materials, explore sustainable design principles, and consider how modern technology can enhance traditional craftsmanship techniques.

Step 7: Refine Your Chair Design Skills
The iterative design process transforms good ideas into great chairs through systematic refinement. Start with rough concepts, build quick mockups from cardboard or foam core, test proportions and comfort factors, then gradually increase fidelity through successive prototypes. Document what works and what doesn't, maintaining design notebooks that capture insights for future projects. Prototyping serves multiple purposes: testing structural integrity, evaluating comfort factors, assessing construction complexity, and estimating material costs. Build prototypes at increasing levels of refinement—from rough concept models to near-final versions. Each prototype should answer specific questions about your design. User feedback provides invaluable perspectives that designers often miss. Observe people interacting with your prototypes, ask specific questions about comfort and usability, and remain open to suggestions that might challenge your initial vision. The best chair designers are excellent listeners who can translate user needs into elegant design solutions.
Step 8: Master Advanced Chair Construction Techniques
Steam bending opens entirely new design possibilities by allowing wood to form curves impossible through cutting alone. Master the steam box construction, understand moisture content requirements for successful bending, learn to design appropriate forms, and develop timing skills that prevent cracking while achieving desired curves. Different species respond differently to steam bending—experiment with ash, oak, and cherry to understand their unique characteristics. Laminating enables thin wood strips to create strong curved components while minimizing waste. Learn to prepare consistent thickness strips, master glue application techniques for even pressure distribution, and design forms that account for spring-back after glue cure. Consider both bent laminations for curves and straight laminations for increasing strength in critical areas. Carving and sculpting transforms functional chairs into artistic statements. Develop tool control with gouges, chisels, and rasps, understand grain direction for clean cuts, and practice flowing curves that enhance rather than compromise structural integrity. Start with simple chamfers and progress toward full sculptural elements that express your unique artistic vision.
Conclusion
Chair crafting represents a perfect blend of technical skill, artistic vision, and practical problem-solving. From understanding basic ergonomics to mastering advanced steam bending techniques, each step builds upon previous knowledge while opening new creative possibilities. The journey from novice to master craftsperson requires patience, practice, and continuous learning, but the rewards extend far beyond the furniture you create. Every chair tells a story of decisions made, problems solved, and skills developed. Whether you aspire to create family heirlooms, start a furniture business, or simply enjoy the meditative process of working with wood, these eight steps provide a comprehensive foundation for lifelong learning and creation.
Ready to start your chair crafting journey? Pick up a pencil, sketch your first design, and share your progress with our community of fellow craftspeople!
🚀 Follow This Path FreeFrequently Asked Questions
- How long does it take to master chair crafting?
- Mastering chair crafting is a lifelong journey, but you can create your first functional chair within 3-6 months of consistent practice. Basic skills develop in weeks, while advanced techniques like steam bending may take years to perfect.
- What are common mistakes beginners make?
- Common mistakes include rushing to build before understanding design principles, choosing inappropriate wood for the application, neglecting ergonomic requirements, and attempting complex techniques without mastering fundamentals first.
- What tools do I need to get started?
- Essential tools include measuring devices, hand saws or circular saw, chisels, drill, sandpaper, and basic hand planes. Start with quality basics rather than acquiring many specialized tools initially.
- Can I make chairs without expensive power tools?
- Absolutely! Many master craftspeople prefer hand tools for their precision and quiet operation. While power tools increase efficiency, hand tools often produce superior results and provide better learning experiences for developing fundamental skills.
Recent Posts